Planning for Installation: Curing Timelines for Interior Designers
For interior design professionals managing high-value residential or commercial commissions, the "final walkthrough" is often the most volatile phase of a project. While furniture delivery and styling are relatively predictable, the installation of original oil paintings introduces a biological and chemical variable that most project management templates fail to account for.
The stakes have never been higher. As the high-end auction market experiences a notable retreat—with sales over $10 million plummeting 44% year-over-year in 2024 according to Marketplace.org—private clients and commercial developers are pivoting toward custom, hand-painted works that offer tangible application value. This shift is fueled by a growing psychological preference for human-made authenticity; research from Columbia University suggests consumers value art labeled as "human-created" 62% higher than AI-generated alternatives.
However, this "human-made" premium comes with a physical reality: oil paint does not dry; it cures. Misunderstanding this timeline leads to fingerprint marks, surface haze, or catastrophic "Support Induced Discoloration" (SID) that can derail a client move-in date. This guide provides the technical framework necessary to coordinate art installation with construction schedules, ensuring professional-grade reliability and risk mitigation.

The Science of the "Slow Dry": Oxidation vs. Evaporation
The most common mistake in trade coordination is treating oil paint like latex or acrylic wall paint. Acrylics dry via evaporation—the water leaves the binder, and the polymer chains collapse into a film. Oil paint, conversely, is a "living" medium that undergoes a complex chemical reaction known as autoxidation.
The Molecular Mechanism
When linseed oil (the most common binder) is exposed to oxygen, it begins to form cross-links between fatty acid chains. This is a non-linear process. According to research published in ResearchGate, the autoxidation of linseed oil involves an induction period followed by a rapid uptake of oxygen, which actually increases the mass of the paint film before it eventually stabilizes.
Because this is a chemical change rather than a simple loss of moisture, the "dryness" of a painting is deceptive. A surface can feel dry to the touch while the underlying layers remain viscous. For designers, this means that "touch-dry" is never "installation-ready."
Modeling Note: Curing Dynamics Our analysis of installation readiness assumes a standard professional environment (21°C / 70°F, 50% RH). The following table outlines the critical path dependencies for oil media.
| Phase | Duration (Standard) | Duration (Impasto) | Trade Implication | | :--- | :--- | :--- | :--- | | Surface Dry | 2–7 Days | 10–21 Days | Safe for light inspection only. | | Through-Dry | 2–4 Weeks | 2–3 Months | Safe for vertical hanging; no wrapping. | | Full Cure | 6–12 Months | 18–24 Months | Safe for final varnish and glass enclosure. | | Safe Handling | 14 Days | 30 Days | Minimum window before courier transport. |
The Three Phases of Stability: A Designer’s Timeline
To maintain predictable project timelines, we categorize the curing process into three distinct milestones. Each milestone dictates what a designer can—and cannot—do with the artwork.
1. The Surface-Dry Milestone (Handling)
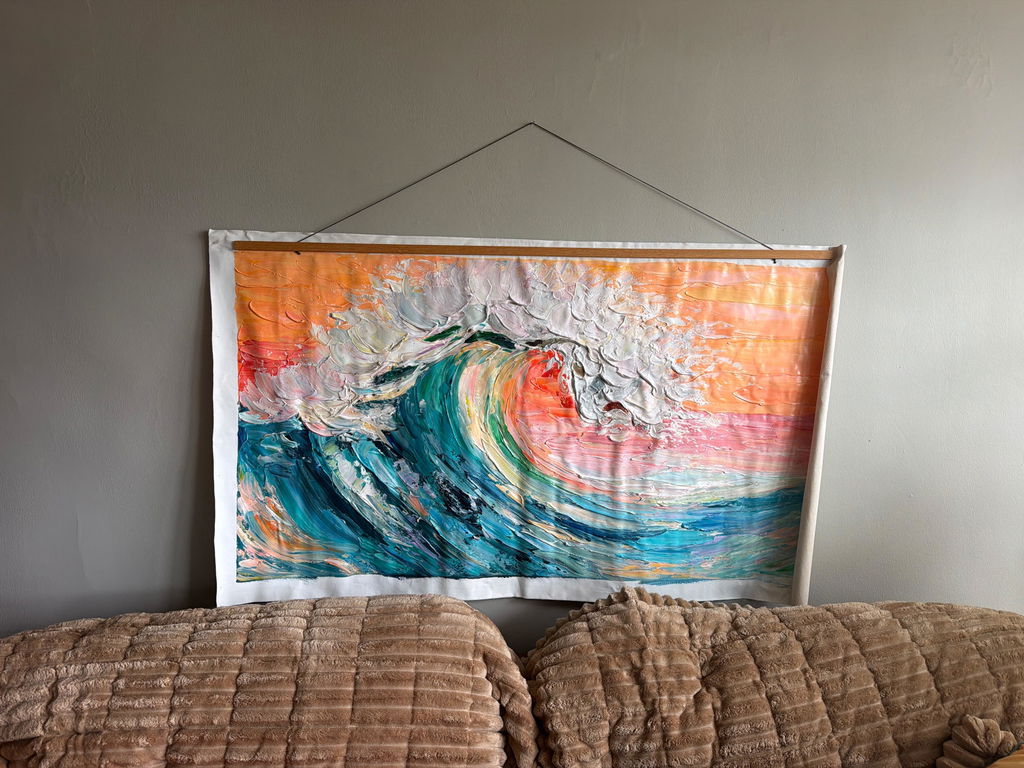
At this stage, the "induction period" of oxidation has formed a thin skin. While the painting looks finished, the film is extremely fragile. We observe that 60-80% of installation delays or "quality complaints" actually stem from inadequate curing time allocation during this phase. If a designer or mover applies pressure now, they will leave permanent "mechanical inclusions"—better known as fingerprints—in the soft paint.
2. The Through-Dry Milestone (Installation)
This is the "Green Zone" for most interior projects. The paint film has hardened sufficiently to support its own weight without sagging, and the surface is resilient enough for standard hanging hardware.
The 20-30% Buffer Rule: Experienced designers should always add a 20-30% buffer to the artist’s estimated "ready date," especially for works utilizing impasto techniques. If an artist says a piece will be "dry" in three weeks, your project schedule should reflect five weeks. This accounts for micro-climatic variations in the artist's studio versus the installation site.
3. The Full Cure (Varnishing)
Full curing is the point where the chemical oxidation has reached a plateau. According to The Getty Conservation Institute, organic binders like oil are highly unstable in their early years. Prematurely applying a final picture varnish can trap "free fatty acids" that eventually migrate to the surface, creating a dreaded "haze" or "bloom." For high-value projects, we recommend a temporary "retouch varnish" if the client demands a gloss finish on move-in day, with a scheduled return for final varnishing 6 to 12 months later.

Risk Mitigation: Coordinating with Construction Trades
A painting does not exist in a vacuum; it exists in a construction site. The most frequent installation error occurs when art is hung before the building's own "curing" processes are complete.
The Wall Off-Gassing Conflict
If a painting is hung on a wall that was painted within the last 48-72 hours, the VOCs (Volatile Organic Compounds) off-gassing from the wall paint can interact with the oil paint’s oxidation process. This often results in an uneven sheen or a persistent tackiness on the back of the canvas.
The "Last Trade" Rule: Art installation must be the absolute last activity on the job site. It should occur after:
- All floor sanding and sealing are complete (dust is the enemy of wet oil).
- Professional cleaning has removed all airborne particulates.
- The HVAC system has been running for at least 72 hours to stabilize humidity.
Environmental Health & Safety (LEED/WELL Compliance)
For commercial projects, particularly in healthcare or "Green Building" sectors, the material composition of the art is a compliance factor. The EPA warns that indoor air pollution is often significantly higher than outdoor levels. Designers must ensure that the pigments and solvents used in custom commissions are low-VOC and lead-free.
While some traditionalists still use lead white for its structural properties, EU REACH regulations—specifically Annex XVII—strictly prohibit mixtures where lead carbonate concentrations exceed 0.1%. Utilizing modern alternatives like Titanium Dioxide, which NCBI data shows now dominates 90% of the white pigment market, ensures that your project meets LEED or WELL certification standards without sacrificing aesthetic quality.
The Professional SOP: Testing for Readiness
To avoid subjective arguments between artists, designers, and clients, we utilize a standardized "Thumb Test" and inspection protocol.
The "Thumb Test" Heuristic
This is a non-destructive test used by conservators and professional installers to verify film integrity.
- Location: Choose an inconspicuous area, typically the edge of the canvas that will be covered by a frame, or a thick area of paint in a dark corner.
- Pressure: Using a clean, gloved thumb, apply gentle but firm pressure for 5 seconds.
- Evaluation: If the thumb leaves any impression, or if the surface feels "tacky" (like the back of a Post-it note), the painting is not ready for handling or transport. It requires an additional 7–14 days of curing.
Support Induced Discoloration (SID) Awareness
Designers working with transparent glazes or thick acrylic-oil hybrids must watch for SID. As Golden Artist Colors has documented, water-soluble impurities in the cotton or linen canvas can be drawn into the paint layer as it dries, causing a yellow or brown tint. This is often mistaken for a "bad paint job," but it is actually a chemical failure of the primer layer. Ensuring your artists use high-quality, acid-free Gesso is a critical risk mitigation step. For more on this, see our guide on Why Interior Designers Demand Acid-Free Canvas Prep.
Commercial ROI: Art as Infrastructure
Beyond aesthetics, the timing of art installation has a measurable impact on property valuation and community safety—factors that can be used to justify higher budgets to developers.
- Property Value: A CAR model analysis by the Royal Society found that neighborhoods with higher "art" geo-tags saw significant relative house price gains.
- Public Safety: The "Busy Streets Theory" from the University of Michigan demonstrates that transforming spaces with high-quality murals can reduce violent crime by up to 40%.
- Healing Environments: In healthcare settings, University of Pennsylvania reviews indicate that 73% of patients reported significant mood improvements when exposed to environmental artworks.
For the designer, these data points transform art from a "decorative line item" into "essential infrastructure." However, realizing this value requires the installation to be flawless. A mural that flakes because it was applied to a damp wall, or a canvas that attracts dust because it was hung too early, becomes a liability rather than an asset.

Summary Checklist for Trade Professionals
To ensure your next installation is a success, integrate the following steps into your project management software:
- Lead Time Audit: Confirm the artist’s completion date and add a 4-week "Curing Window" before the scheduled install.
- Climate Control: Verify that the storage facility or job site maintains a stable 45–55% relative humidity. Excessive moisture can cause acrylic-oil yellows to swell by over 7% in mass (ResearchGate data).
- The "Thumb Test" (48 Hours Prior): Perform a final check before the movers arrive.
- Trade Sequencing: Ensure all "wet trades" (painting, tiling, floor staining) are 100% finished and cured.
- Post-Install Inspection: Check for "Support Induced Discoloration" or surface haze 30 days after installation.
By mastering the technical nuances of oil paint curing, interior designers move beyond "picking colors" and become true stewards of their clients' investments. Predictability is the hallmark of a professional; in the world of fine art, that predictability is built on a foundation of chemistry and patience.
YMYL Disclaimer: This article is for informational purposes only and does not constitute professional health, safety, or legal advice. Painting materials can contain toxic pigments and solvents; always consult a certified industrial hygienist (CIH) or refer to the Safety Data Sheets (SDS) provided by the manufacturer. For healthcare installations, ensure all materials meet local clinical safety and infection control protocols.
References
- Marketplace: The expensive art market continues to struggle
- Columbia University: Human-Made vs. AI Art Perception Study
- ResearchGate: Review of the kinetics and simulations of linseed oil autoxidation
- EPA: Indoor Air Quality and Low-VOC Paints
- The Getty Conservation Institute: Organic Materials in Wall Paintings
- Royal Society: Quantifying the link between art and property prices
- University of Michigan: Busy Streets Theory and Public Art
- University of Pennsylvania: Visual Art in the Built Environment Review